- Published on
How to build a fully internationalized Nextjs application using Lingui v4
In this tutorial we will build an internationalized (i18n) Nextjs application using the latest v4 version of Lingui.js.
Completing the tutorial should result in a good understanding of the Lingui internationalization process as well as a fully functioning multi-language Typescript sample application with:
- Support for three languages (English, Dutch and Pseudo)
- Nextjs subpath routing
- Translation files in
*.poformat, ready for super smooth Crowdin online translations - A language switcher (optionally)
- Working test suite integration using Vitest and the Lingui swc-plugin
Table of Contents
- 1. Preparing the Nextjs application
- 2. Setting up Lingui
- 3. Setting up the application
- 4. Lingui message extraction
- 5. Message catalogs
- 6. Translating messages
- 7. Activating Lingui locales
- 8. Locale Switcher
- 9. Test suite integration
Disclaimer
Please note that Lingui is not limited to Nextjs and can be used in any Javascript application.
TL;DR
A repository with the resultant application can be found here.
1. Preparing the Nextjs application
Create a basic Nextjs application using the following configuration options:
- Typescript:
yes - ESLint:
yes - Tailwind CSS:
yes - Use src directory:
yes - Use experimental app directory:
no - Do not configure an import alias:
enter
npx create-next-app@latest lingui-v4-app
Install the Lingui dependencies:
cd lingui-v4-app
npm install @lingui/core @lingui/react
npm install @lingui/cli @lingui/loader @lingui/macro --save-dev
npm install @lingui/swc-plugin --save-dev
2. Setting up Lingui
Lingui v4 comes with a lot of improvements that make setting up internationalization a lot easier. For example, plural support now comes out of the box and we no longer need to configure babel because we can use the Lingui swc-plugin instead. For an overview of all new v4 features and changes, please refer to these Migrating to v4 release notes.
lingui.config.js
Following Lingui best practices, first create file lingui.config.js in the root of your project with below content.
const { formatter } = require("@lingui/format-po")

const locales = ["en-us", "nl-nl"]

if (process.env.NODE_ENV !== "production") {
  locales.push("pseudo")
}

/** @type {import('@lingui/conf').LinguiConfig} */
module.exports = {
  locales: locales,
  sourceLocale: "en-us",
  pseudoLocale: "pseudo",
  catalogs: [
    {
      path: "<rootDir>/src/translations/locales/{locale}",
      include: [
        "<rootDir>/src/pages",
        "<rootDir>/src/translations/languages.ts",
      ],
    },
  ],
  format: formatter({ origins: false }),
}
We will get into details later but basically this configuration:
- Is the single source of truth for all our Lingui/Nextjs internationalization settings
- Uses English (en-us) as the base language
- Will ony translate files found in the
includepaths - Will generate translation files in
*.poformat, in the folder specified aspath - Supports two languages when in production mode
- Supports pseudolocalization but only when in development mode
next.config.js
To make Nextjs Internationalized (i18n) Routing aware of our Lingui configuration, update next.config.js as shown below.
const linguiConfig = require("./lingui.config")

/** @type {import('next').NextConfig} */
const nextConfig = {
  reactStrictMode: true,
  experimental: {
    swcPlugins: [
      [
        "@lingui/swc-plugin", {}
      ],
    ],
  },
  i18n: {
    locales: linguiConfig.locales,
    defaultLocale: linguiConfig.sourceLocale,
  },
  webpack: (config) => {
    config.module.rules.push({
      test: /\.po$/,
      use: {
        loader: "@lingui/loader", // https://github.com/lingui/js-lingui/issues/1782
      },
    })

    return config
  },
}

module.exports = nextConfig
This will:
- Make
lingui.config.jsthe single source of truth for Nextjs internationalizated routing - Enable the Lingui swc-plugin
package.json
Later on, we will use the Lingui CLI to extract translatable messages in our code into *.po message catalog files.
To prepare for extracting, add the following npm run script to your package.json
"translations:extract": "lingui extract --clean",
crowdin.yml
Create a crowdin.yml configuration file in the root of your project with below content to ensure that Crowdin will be able to detect, use and update the correct message catalogs in your application.
files:
  - source: /src/translations/locales/en-us.po
    translation: /src/translations/locales/%locale%.po
3. Setting up the application
_document.tsx
Nextjs will automatically update the lang meta tag for your pages using the active locale but only after you have updated src/pages/_document.tsx and have changed
<Html lang="en">
to
<Html>
To make sure things work as expected:
- Run
npm run dev - Browse to
localhost:3000/nl-nl - Inspect the source code of the page and make sure it starts with
<html lang="nl-nl">
Lingui folders
To make sure Lingui will function as expected, create the following two folders:
src/translationssrc/translations/locales
languages.ts
Create src/translations/languages.ts which will:
- Help keep our code clean
- Prepare for adding additional languages and properties
- Allow us to run our first CLI message extraction (which will detect the three translatable messages using the Lingui
msgmacro)
import { MessageDescriptor } from "@lingui/core"
import { msg } from "@lingui/macro"

interface Languages {
  locale: string
  msg: MessageDescriptor
  territory?: string
  rtl: boolean
}

export type LOCALES = "en-us" | "nl-nl" | "pseudo"

const languages: Languages[] = [
  {
    locale: "en-us",
    msg: msg`English`,
    territory: "US",
    rtl: false,
  },
  {
    locale: "nl-nl",
    msg: msg`Dutch`,
    territory: "NL",
    rtl: false,
  },
]

if (process.env.NODE_ENV !== "production") {
  languages.push({
    locale: "pseudo",
    msg: msg`Pseudo`,
    rtl: false,
  })
}

export default languages
Please note that we are deliberately using the Lingui msg macro here so that backticked messages appear in our *.po message catalog files and that we can use those messages anywhere in our code (later on). For more information about the msg macro and when to use it/not use it please visit this page.
Lingui Pro-Tip: stick to using natural language for your translatable messages and avoid using IDs at all cost. This will prevent double work and will lead to much cleaner code and a better translator experience.
4. Lingui message extraction
Message extraction is an essential step in the internationalization process. It involves:
- Analyzing your code
- Extracting all translatable messages into a
*.pomessage catalog - Thereby keeping your message catalogs in-sync with your source code
Even though we currently only have a limited set of translatable message in our code (the backticked msg macros found in languages.ts) we will now run an extraction to get familiar with the process.
npm run translations:extract
If things went well, your screen should display something similar to:
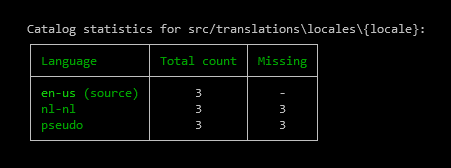
Which basically means that Lingui extraction:
- Has detected three active languages
- Has therefore generated three message catalogs:
/src/translations/locales/en-us.po/src/translations/locales/nl-nl.po/src/translations/locales/pseudo.po
- Has found three translatable messages in our source code
- Has detected that three messages are currently untranslated for both the
nl-nlandpseudolocales
Please note that the
sourceandpseudolanguages should NEVER be translated/touched
5. Message catalogs
The message catalogs we have just extracted contain all translatable messages and their translations.
If you open our freshly generated /src/translations/locales/nl-nl.po file it should look similar to:
msgid ""
msgstr ""
"X-Generator: @lingui/cli\n"

msgid "Dutch"
msgstr ""

msgid "English"
msgstr ""

msgid "Pseudo"
msgstr ""
6. Translating messages
Translators can translate the messages found inside the message catalogs using three methods:
- Manually by directly editing the
*.pofiles (highly discouraged) - Using local tools like the Poedit Translation Editor
- Using online collaboration platforms like Crowdin which provide more efficient workflows, better automation possibilities and a far superior translator experience because translators only have to use the Crowdin online editor. For an impression of the (limited amount of) steps required for Crowdin translators please visit this page.
For now, we will now make our first translations by manually changing the content of /src/translations/locales/nl-nl.po to:
msgid ""
msgstr ""
"X-Generator: @lingui/cli\n"

msgid "Dutch"
msgstr "Nederlands"

msgid "English"
msgstr "Engels"

msgid "Pseudo"
msgstr "Pseudo"
If you rerun npm run translations:extract, you should see that nl-nl no longer has missing translations which means that we are now able to actually start displaying those translations inside our application.
7. Activating Lingui locales
Before we can start displaying translated messages we first need to update our application so that it will activate and load the correct locale (using the active Nextjs i18n route).
utils.ts
Create src/translations/utils.ts with below two helper functions and where:
loadCatalog()will be used on every page that requires translatinguseLinguiInit()will only be used by_app.tsxto initialize Lingui
import { i18n, Messages } from "@lingui/core"
import { useRouter } from "next/router"
import { useEffect } from "react";

export async function loadCatalog(locale: string) {
  const { messages } = await import(`./locales/${locale}.po`)

  return messages
}

export function useLinguiInit(messages: Messages) {
  const router = useRouter();
  const locale = router.locale || router.defaultLocale!;
  const isClient = typeof window !== "undefined";

  if (!isClient && locale !== i18n.locale) {
    // there is single instance of i18n on the server
    i18n.loadAndActivate({ locale, messages });
  }
  if (isClient && !i18n.locale) {
    // first client render
    i18n.loadAndActivate({ locale, messages });
  }

  useEffect(() => {
    const localeDidChange = locale !== i18n.locale;
    if (localeDidChange) {
      i18n.loadAndActivate({ locale, messages });
    }
  }, [locale, messages]);

  return i18n;
}
_app.tsx
We will now enable Lingui for our application by updating src/pages/_app.tsx so that it uses useLinguiInit() and the I18nProvider and looks like this:
import "@/styles/globals.css";
import type { AppProps } from "next/app";
import { I18nProvider } from "@lingui/react";
import { useLinguiInit } from "src/translations/utils";

export default function App({ Component, pageProps }: AppProps) {
  const initializedI18n = useLinguiInit(pageProps.i18n);

  return (
    <I18nProvider i18n={initializedI18n}>
      <Component {...pageProps} />
    </I18nProvider>
  );
}
index.ts
Because Lingui v4 supports all Nextjs page rendering methods you should always select the rendering method best suitable for your application page.
In this tutorial, we choose to use Server Side Rendering (SSR) to activate the Lingui message catalog for our index page and enable it by replacing the content of src/pages/index.tsx with the following code:
import styles from "@/styles/Home.module.css";
import { GetServerSidePropsContext, GetServerSidePropsResult } from "next";
import { loadCatalog } from "src/translations/utils";
import { Trans } from "@lingui/macro";
import Link from 'next/link'

export default function Home() {
  return (
    <main className={styles.main}>
      <div>
        <ul>
          <li><Link href="/" locale="en-us">English: <Trans>English</Trans></Link></li>
          <li><Link href="/" locale="nl-nl">Dutch: <Trans>Dutch</Trans></Link></li>
          <li><Link href="/" locale="pseudo">Pseudo: <Trans>Pseudo</Trans></Link></li>
        </ul>
      </div>
    </main>
  );
}

export async function getServerSideProps(
  ctx: GetServerSidePropsContext
): Promise<GetServerSidePropsResult<any>> {
  // some server side logic

  return {
    props: {
      i18n: await loadCatalog(ctx.locale as string),
    },
  };
}
If you browse to localhost:3000 you should now see the following:
- A list with our three languages
- Clicking a language will load the translations for that language, handled by the Lingui
Transmacro - When browsing to pseudo, diacritics will be shown for all messages that require a translation which is very useful for debugging purposes because untranslated elements will not contain diacritics
Please note that we are deliberately using the Lingui Trans macro here. This macro is intended for use within JSX and supports static messages, messages with variables and even messages with inline markup. For more information about the Trans macro and when to use it/not use it please visit this page.
Pro-Tip: if you are only using
GetServerSideProps()to load the Lingui message catalog, you should switch to usingGetStaticProps()as that will unblock Nextjs static optimizations for static pages.
404.tsx
Because the Nextjs 404 page is rendered using Static Generation (SSG) we cannot use GetServerSideProps but have to use GetStaticProps instead. To keep things interesting we will:
- Add an additional translatable message but this time using the Lingui
tmacro - Run a new message extraction
- Update the Dutch
nl-nlmessage catalog - See our translated 404 page in action
First create src/pages/404.tsx with the following content:
import Head from "next/head";
import { GetStaticPropsContext, GetStaticPropsResult } from "next";
import { t, Trans } from "@lingui/macro";
import { loadCatalog } from "@/translations/utils";

export default function Custom404() {
  return (
    <>
      <Head>
        <title>{t`Page Not Found`}</title>
      </Head>
      <h1>
        <Trans>Page Not Found</Trans>
      </h1>
    </>
  );
}

export async function getStaticProps(
  ctx: GetStaticPropsContext
): Promise<GetStaticPropsResult<any>> {
  return {
    props: {
      i18n: await loadCatalog(ctx.locale as string),
    },
  };
}
Please note that we are now also using the Lingui t macro here. This macro is basically identical to the Trans macro but simply returns a translated string (instead of a JSX element) and is therefore perfectly suited for translating page properties etc. For more information about the t macro and when to use it/not use it please visit this page.
Let's continue with the tutorial by running npm run translations:extract and updating the nl-nl message catalog so that it looks like this:
msgid ""
msgstr ""
"X-Generator: @lingui/cli\n"

msgid "Dutch"
msgstr "Nederlands"

msgid "English"
msgstr "Engels"

msgid "Page Not Found"
msgstr "Pagina niet gevonden"

msgid "Pseudo"
msgstr "Pseudo"
If things went well, browsing to the non-existing page localhost:3000/nl-nl/whatever should show the Dutch 404 page:
- Using the Dutch message translation for page title
Page Not Found - Using the Dutch message translation for page content
Page Not Found
8. Locale Switcher
No internationalized application is complete without a proper locale switcher that allows the user to switch languages using a dropdown menu. To prevent duplication of already available information, please turn to these excellent examples for inspiration:
9. Test suite integration
The Lingui swc-plugin is compatible with most test suites but in this tutorial we will use Vitest to provide you with an example of test suite integration.
Install the required dependencies by running:
npm install jsdom @testing-library/react --save-dev
npm install vitest vite-tsconfig-paths @vitejs/plugin-react-swc --save-dev
Add the following npm run script to package.json:
"test": "vitest run",
Create vitest.config.ts in the root of your project with the following content:
import { loadEnvConfig } from "@next/env"
import { defineConfig } from "vitest/config"

import react from "@vitejs/plugin-react-swc"
import tsconfigPaths from "vite-tsconfig-paths"

const projectDir = process.cwd()
loadEnvConfig(projectDir)

// https://vitejs.dev/config/
export default defineConfig({
  plugins: [react({ plugins: [["@lingui/swc-plugin", {}]] }), tsconfigPaths()],
  test: {
    dir: "./",
  },
})
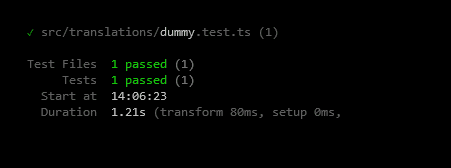
Create test file `src/translations/dummy.test.ts" with the following content:
import { it, expect } from "vitest"

it("is just a dummy test to make sure vitest works with lingui swc-plugin", () => {
    expect("a").toEqual("a")
})
If things went well, executing the test suite by running npm run test should produce a screen similar to:
10. Please remember
- Try to use the Lingui
Trans,tandmsgmacros wherever possible - Use the Lingui context property if you want to provide hints to translators
- Use
msgfor constants and when passing translatable messages between functions - Use the Lingui UseLingui() hook or Lingui
tmacros might not update in realtime (e.g. when using the language switcher)
11. Rounding Up
This tutorial should have provided you with a good starting point to properly incorporate localizaton and support multiple languages in your Nextjs application but there is more to explore:
- Make sure to read up on background, rationale and various react patterns in the Lingui documentation
- Make sure to check out the various (more extensive) application examples in the Lingui examples folder
- Try implementing a next-sitemap with support for i18n, implementation example found here
Lastly
It is highly recommended to register with, and try the free version of, Crowdin which provides more than sufficient functionality for small(er) projects:
- Superior translator experience because translators can use the online editor, no coding skills required!
- One Github integration for automated translations via Pull Requests
- Instant pre-translations for new languages using machine learning
- A description of the Crowdin workflow is described at this Lingui page
Support
If you have any additional questions regarding Lingui or need support, please visit the Lingui Discord server.